.
Networking In VirtualBox
|
The original URL has lost the link to the images.
Thus the content (with the missing images) is copied to here for reference purposes.
|
Networking in VirtualBox
 Networking in VirtualBox is extremely powerful, but can also be a bit daunting, so here's a quick overview of the different ways you can setup networking in VirtualBox, with a few pointers as to which configurations should be used and when.
VirtualBox allows you to configure up to 8 virtual NICs (Network Interface Controllers) for each guest vm (although only 4 are exposed in the GUI) and for each of these NICs you can configure:
- Which virtualized NIC-type is exposed to the Guest. Examples include:
- Intel PRO/1000 MT Server (82545EM),
- AMD PCNet FAST III (Am79C973, the default) or
- a Paravirtualized network adapter (virtio-net).
- How the NIC operates with respect to your Host's physical networking. The main modes are:
The choice of NIC-type comes down to whether the guest has drivers for that NIC. VirtualBox, suggests a NIC based on the guest OS-type that you specify during creation of the vm, and you rarely need to modify this.
But the choice of networking mode depends on how you want to use your vm (client or server) and whether you want other machines on your network to see it. So let's look at each mode in a bit more detail...
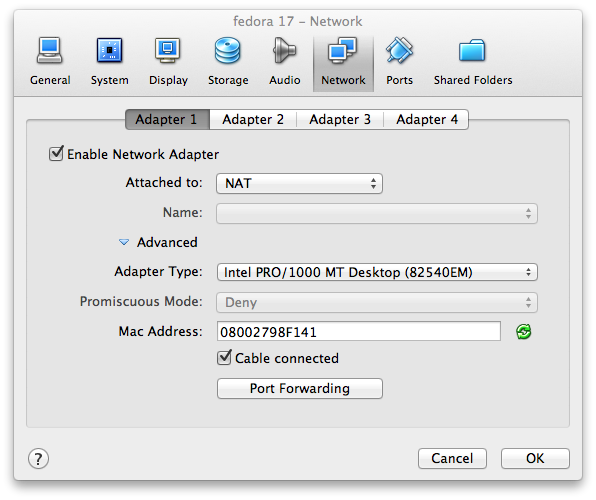
Network Address Translation (NAT)
This is the default mode for new vm's and works great in most situations when the Guest is a "client" type of vm. (i.e. most network connections are outbound). Here's how it works:
When the guest OS boots, it typically uses DHCP to get an IP address. VirtualBox will field this DHCP request and tell the guest OS its assigned IP address and the gateway address for routing outbound connections. In this mode, every vm is assigned the same IP address (10.0.2.15) because each vm thinks they are on their own isolated network. And when they send their traffic via the gateway (10.0.2.2) VirtualBox rewrites the packets to make them appear as though they originated from the Host, rather than the Guest (running inside the Host).
This means that the Guest will work even as the Host moves from network to network (e.g. laptop moving between locations), and from wireless to wired connections too.
However, how does another computer initiate a connection into a Guest? e.g. connecting to a web server running in the Guest. This is not (normally) possible using NAT mode as there is no route into the Guest OS. So for vm's running servers we need a different networking mode....
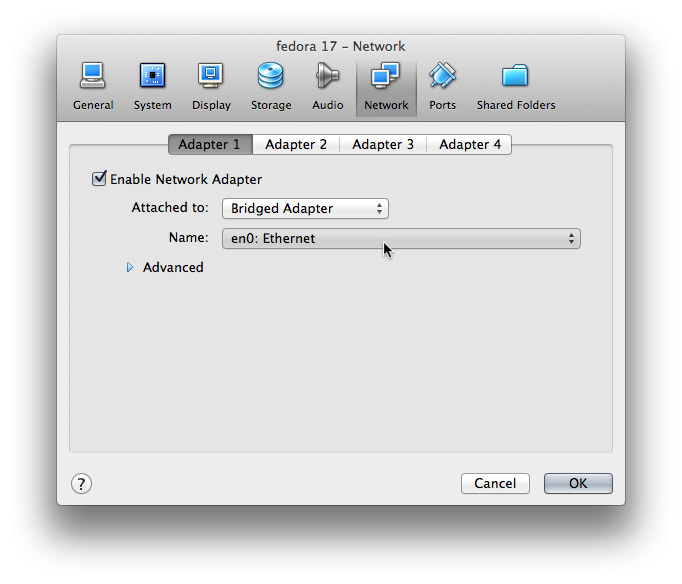
Bridged Networking
Bridged Networking is used when you want your vm to be a full network citizen, i.e. to be an equal to your host machine on the network.
In this mode, a virtual NIC is "bridged" to a physical NIC on your host, like this:
The effect of this is that each VM has access to the physical network in the same way as your host. It can access any service on the network such as external DHCP services, name lookup services, and routing information just as the host does. Logically, the network looks like this:
The downside of this mode is that if you run many vm's you can quickly run out of IP addresses or your network administrator gets fed up with you asking for statically assigned IP addresses. Secondly, if your host has multiple physical NICs (e.g. Wireless and Wired) you must reconfigure the bridge when your host jumps networks.
Hmm, so what if you want to run servers in vm's but don't want to involve your network administrator? Maybe one of the next 2 modes is for you...
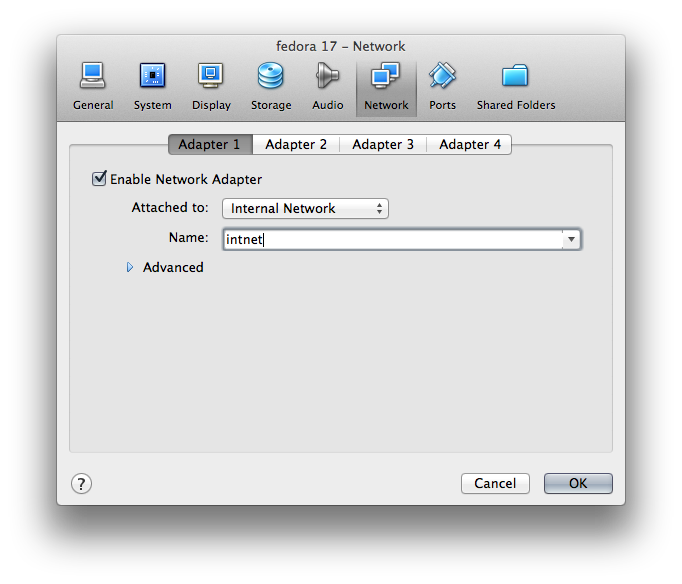
Internal Networking
When you configure one or more vm's to sit on an Internal network, VirtualBox ensures that all traffic on that network stays within the host and is only visible to vm's on that virtual network. Configuration looks like this:
The internal network ( in this example "intnet" ) is a totally isolated network and so is very "quiet". This is good for testing when you need a separate, clean network, and you can create sophisticated internal networks with vm's that provide their own services to the internal network. (e.g. Active Directory, DHCP, etc). Note that not even the Host is a member of the internal network, but this mode allows vm's to function even when the Host is not connected to a network (e.g. on a plane).
Note that in this mode, VirtualBox provides no "convenience" services such as DHCP, so your machines must be statically configured or one of the vm's needs to provide a DHCP/Name service.
Multiple internal networks are possible and you can configure vm's to have multiple NICs to sit across internal and other network modes and thereby provide routes if needed.
But all this sounds tricky. What if you want an Internal Network that the host participates on with VirtualBox providing IP addresses to the Guests? Ah, then for this, you might want to consider Host-only Networking...
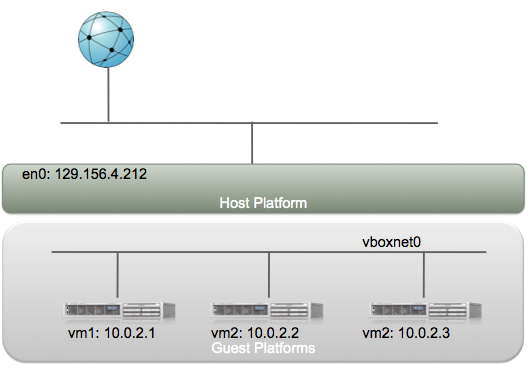
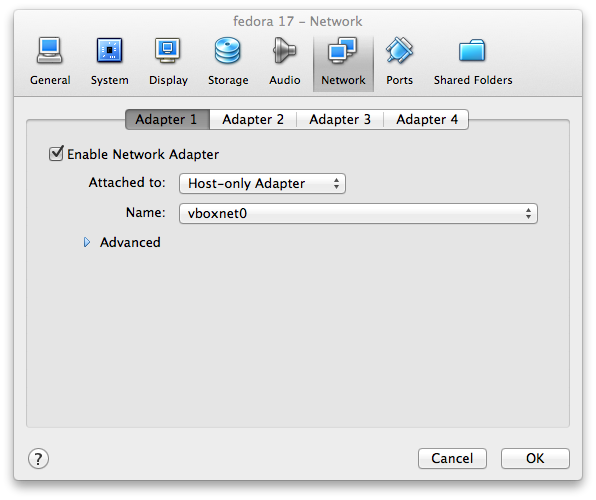
Host-only Networking
Host-only Networking is like Internal Networking in that you indicate which network the Guest sits on, in this case, "vboxnet0":
All vm's sitting on this "vboxnet0" network will see each other, and additionally, the host can see these vm's too. However, other external machines cannot see Guests on this network, hence the name "Host-only".
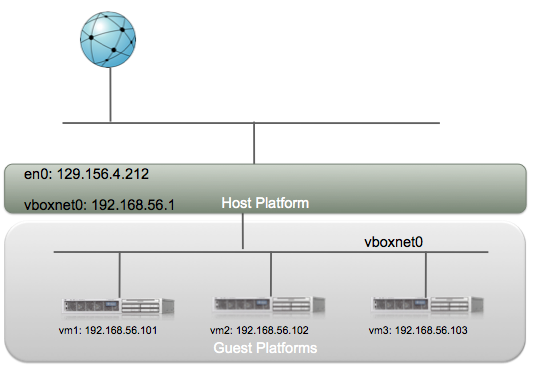
Logically, the network looks like this:
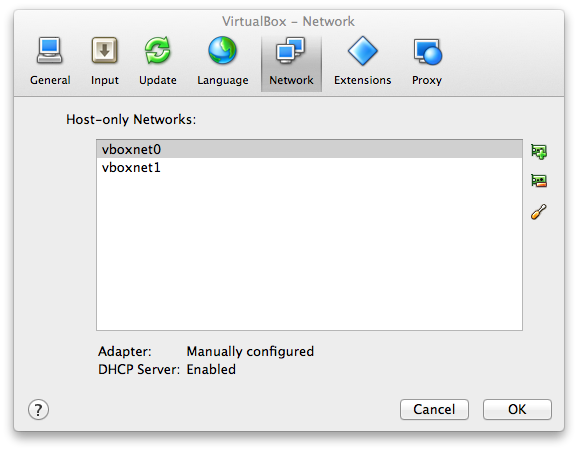
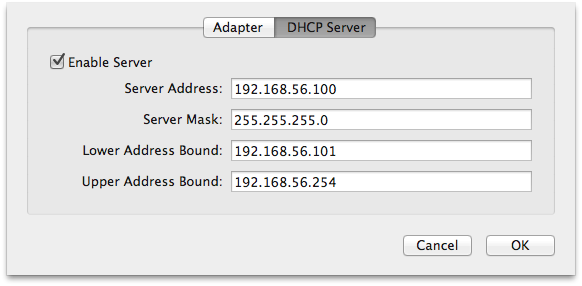
This looks very similar to Internal Networking but the host is now on "vboxnet0" and can provide DHCP services. To configure how a Host-only network behaves, look in the VirtualBox Manager...Preferences...Network dialog:
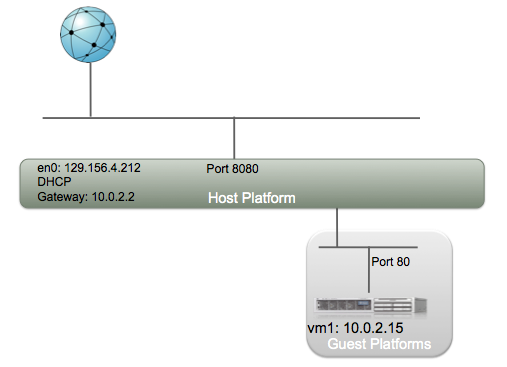
Port-Forwarding with NAT Networking
Now you may think that we've provided enough modes here to handle every eventuality but here's just one more...
What if you cart around a mobile-demo or dev environment on, say, a laptop and you have one or more vm's that you need other machines to connect into? And you are continually hopping onto different (customer?) networks.
In this scenario:
- NAT - won't work because external machines need to connect in.
- Bridged - possibly an option, but does your customer want you eating IP addresses and can your software cope with changing networks?
- Internal - we need the vm(s) to be visible on the network, so this is no good.
- Host-only - same problem as above, we want external machines to connect in to the vm's.
Enter Port-forwarding to save the day!
- Configure your vm's to use NAT networking;
- Add Port Forwarding rules;
- External machines connect to "host":"port number" and connections are forwarded by VirtualBox to the guest:port number specified.
For example, if your vm runs a web server on port 80, you could set up rules like this:
...which reads: "any connections on port 8080 on the Host will be forwarded onto this vm's port 80".
This provides a mobile demo system which won't need re-configuring every time you open your laptop lid.
Summary
VirtualBox has a very powerful set of options allowing you to set up almost any configuration your heart desires.
-FB
.


Follow Us
Were this world an endless plain, and by sailing eastward we could for ever reach new distances